Day trading index options sits at the extreme edge of the difficulty curve: only a small minority of traders achieve consistent profitability. Why? Because they lack a proven system built on real results.
Over the last 10 years, I have refined a specific system. It is not a magic indicator. It is a set of filters designed to keep you out of bad trades and size you into good ones.
1. The Trigger: 10-Minute 8 EMA
In a fast market like SPX 0DTE, simple moving averages create fatal lag. EMAs (Exponential Moving Averages) solve this by applying a weighted multiplier to the most recent data points, making them far more responsive to sudden volatility.
Next, the timeframe: A 5-minute chart creates too much noise ("whipsaws"). Instead, we use the 8 EMA specifically on the 10-minute chart.
We do not enter just because price touches the line.
- > Wait for a full 10-minute candle to CLOSE above/below the 8 EMA.
- > Wait for the RETEST of the 8 EMA.
- > Enter on the bounce (for calls) or rejection (for puts).
2. The Structure: Supply & Demand Levels
The EMA is just a line. To trade successfully, you need a map. We call these Levels (Supply and Demand).
- Demand Zone: An area where buyers previously stepped in with aggression. When price returns here, we look for bounces.
- Supply Zone: An area where sellers previously took control. When price returns here, we look for rejections.
We do not guess. We only look to execute trades when price interacts with these specific zones. We do not trade in "no man's land" between levels.
3. The Filter: VIX Divergence
Most traders ignore the VIX or treat it as a static number. In Alpha Pod, we treat the VIX as a second chart that we trade against.
The VIX has its own Support and Resistance levels. We look for one specific "red flag":
The Divergence Warning
Normally, SPX and VIX move inversely (SPX Up = VIX Down). However, if SPX is making a new high but VIX is also rising (or holding support), that is a "Divergence Warning."
It tells us the rally is fragile and a rug pull is likely imminent. We do not go long when VIX is at support.
4. The Setup: "Convergence"
The highest probability trade occurs when our structural data (Step 2) aligns with our momentum trigger (Step 1). We call this Convergence.
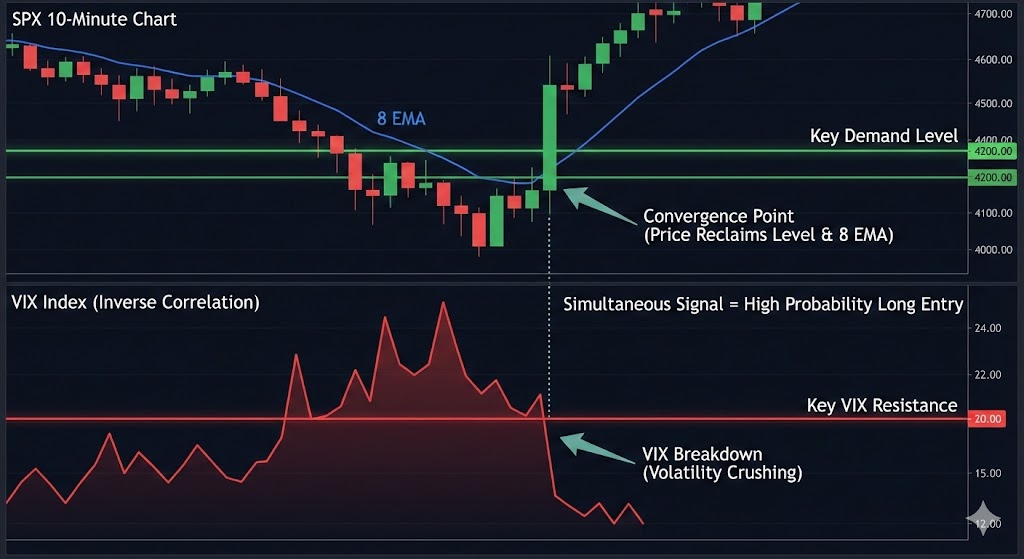
When price reclaims a Key Level AND reclaims the 8 EMA simultaneously, the probability of a sustained move increases drastically.
5. Risk Management: Volatility-Adjusted Sizing
Making money is hard; keeping it is harder. The number one reason traders fail with SPX 0DTE is that they don't respect the volatility.
Standard "stop losses" (e.g., selling if down 20%) often fail in SPX. The market noise is too loud—a single wick can stop you out right before the trade moves in your favor.
Instead, we use Position Sizing as our primary risk tool.
The Alpha Pod Approach: We size our trades small enough that even if the contract goes to zero (100% loss), the portfolio survives to fight another day. This allows us to hold through the volatility and let the thesis play out, rather than getting shaken out by noise.
Ready to apply this live?
I calculate the Levels, analyze the VIX regime, and call out the 8 EMA triggers live every day in the Alpha Pod Discord.
Start 2-Day Free Trial